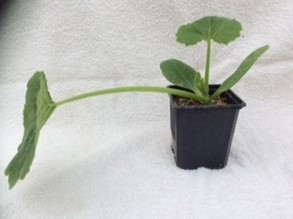
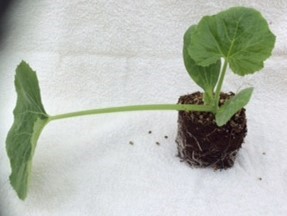
Plant 1m apart in all directions.
Marrows are easy to grow. Grow them in pots, grow bags, raised beds or the vegetable garden.
Marrows like a sunny position on fertile, well-drained soil.

Harden off the marrow plant before it is planted out by placing it outside in a sheltered position during the day. After a week it will have toughened up and become acclimatised.
Prepare the soil by following the dos and don’ts guide. Add plenty of fibrous material (leaf mould, farmyard manure, decaying straw etc) to the soil so that it is open and the water can get away. Making a small mound for the marrow to sit on will help the roots develop.
Planting Out
Soak the pot with water the night before planting so that the soil will hold together round the roots.

Make a planting hole in the soil, the size of the pot.

Remove the plant from the pot by gently holding the marrow stem with finger and thumb whilst spreading other fingers over the soil, tipping the pot upside down and gently shaking the plant out.
Place the root ball into the planting hole and gently push the soil around the roots to fill in the hole. Firm the soil down and water well.
Protect the plant from winds with a cloche, large jam jar or transparent polythene for the first couple of weeks. Put the covers back on if a frost is forecast.
Watering
Keep the soil damp around the plant until it is well established. After that water if the leaves start to wilt in dry spells. Try to place the water under the leaves, so they do not get wet.
Flowers
Marrow plants have separate male and female flowers. They are very big and yellow. The male flowers usually appear first, and do not produce marrow fruits. The male flowers produce pollen which is needed to fertilise the female flowers. Insects transfer the pollen from the male flower to the female flower. The more insects there are flying round the plants the better. Once pollinated the female flower develops a bulge at the base. This grows into a marrow. Let the male flowers die back naturally, don’t cut them off.
Limit to 3 or 4
Allow the plants to produce 3 or 4 marrows. Remove any more fruits that start to develop. Check the plant for marrows from all angles as they are often difficult to see.
Feed
Feed marrows with tomato fertiliser every 2 or 3 weeks, once the flowers appear.
Support
Lift larger marrows off the soil by placing them on a brick or stone. This will keep the bottom of the marrow drier and reduce the possibility of rotting.
Harvest
Leave the marrows on the plant until they have reached a good size, at least 30cm long.
Use a sharp knife to cut the marrow off the plant leaving 5cm of stalk.
Marrows can grow twice as long if fed and watered regularly, producing a spectacular entry for the harvest festival or local produce show!
Storage
If the marrow is going to be stored, remove any leaves shading it from the sun and leave it to ripen on the plant. It will take a couple of weeks for the skin to harden.
With a sharp knife cut the marrow off the plant leaving 5cm of stalk. Place the marrow in a cool, dark, well-ventilated building and wait for it to dry off.
Gently rub the soil off the skin as it dries. Do not wash the marrow. Washed vegetables do not store well. Wait until they are going to be used before washing.
Once dry, store the marrow so that it is sitting on a perforated base (a few sticks will do) so that air can circulate all around it. Alternatively, hang the marrow up in a net bag or a pair of tights. The surrounding conditions should be cool, dark and well ventilated.
Mon - Fri 8:00am - 5:00pm
Sat & Sun 9:00am - 5:00pm
Any questions? Email us or give us a call on 01904 400092.